Cloud Computing implementation on Amazon Web Service

3. Implementation
The project has been developed in a modular manner with each module building on top of the previous one. An overview of the web services and client side systems used in this project are
as follows.
a. Amazon Elastic Compute Cloud (EC2): I have developed my server using Amazon’s EC2. All the server side computations and secure connectivity are handled here.
b. Amazon Relational Database System (RDS): I have used Amazon’s RDS to create and deploy the cloud database.
c. Amazon Simple Storage Service (S3): I have used Amazon’s S3 as a remote storage end point to store all the client side data.
d. Amazon Simple Notification System (SNS): I have used Amazon SNS to implement a push notification system for the client system.
e. Server Side Scripting: I have developed all the server side scripts and computations using PHP as the scripting Language.
f. Client Development: Since the application is designed for an android based home security system, the client system has been designed on android the platform running Android 2.2 operating system.
g. Databases: For the server side computations, I have used MYSQL as the database system. For client side computations, I have used SQLite as the database handler.
Modules and their Implementation:
1. Creating and Instantiating the Cloud Server
2. Server Side Computation
3. Encryption and Salting at Server Side
4. Client Side Development
5. Image Capture and Secure
6. Amazon S3 Integration
7. Browser Display
8. Push Notification using E-Mail
9. Diagnostic Monitoring
3.1 Creating and Instantiating the Cloud Server:
To reduce the application size, and to maintain a centralized information flow, I have created a Linux based Web server using Amazon’s EC2 to act as the server for my application. The steps involved in creating and instantiating the server are as follows:
1. Creating an EC2 Instance
2. Configuring an EC2 Instance
3. Security Groups and Permissions
4. Elastic IP
5. Secure Connections
6. Server Side Computation
Creating an EC2 Instance:
The first step is to login to the Amazon web services console, and open the EC2 dashboard. For this project, we will be using a Linux Based AMI to setup and run our server side scripts. We will also create a key value pair and a private key to securely connect to the instance.
Creating the Key Pair:
A valid key pair is required to connect to the EC2 instance. We need to create a pem key, which is a RSA key pair containing the private key of that instance.
To create a key,
C:> $admin | Format-List KeyName, KeyFingerprint, KeyMaterial [ ]
Key Pair Name: ec2-ubuntu
Fingerprint: 07:70:b9:17:9c:65:5e:7d:a5:40:82:d5:f0:67:bd:e3:d7:9c:62:ec
Snippet of the RSA key :
-----BEGIN RSA PRIVATE KEY-----
MIIEogIBAAKCAQEAijNvctEedgeY50VgqSDF0oXXverxve5q/yE/m6Nqt+fdr4vuNFV8WVR
5PUZq
y03ZAMD9WHChB8ULhJ2hnEi+rUPwpEuamH0SwGvBbxMdGttviY87eTAPE/eWxD9CsaH/
3MOD0hpp
Y0uccgU1XNZ65iJpcapEkXsmtdmr9NCmk6yHXplogPX/np3mo3+ZKZdh1Ts7jgqCDHEWh6
3gsMdn
After creating the private key, we need to pipe it to an output file which can then be used as a
private key. This file is saved with an extention of .pem.
$admin.KeyMaterial | Out-File -Encoding ascii admin.pem
Configuring the EC2 Instance:
Once we have created the EC2 instance, we need to configure the access to the instance. Each instance will have a unique instance id and a public DNS address which can be used to connect to the instance.
Security Groups and Permissions:
Before creating the instance, we need to create a security group to set up the required permissions. Since we want a secure connection to our instance and a secure communication between our client and server, we need to harden our instance accordingly. We need to permit SSH and connections on a specific range of ip addresses.
PS C:> Grant-EC2SecurityGroupIngress -GroupId sg-04037f34-IpProtocol tcp -FromPort 22 -
ToPort 22 -CidrIp 0.0.0.0/0
In the above statement, we are allowing connections from any ip address on port number 22 for
the security group having the id 04037f34.
This lets us open secure shell connections between the EC2 server and the clients.
We will also create an inbound connection on port 80 to listen to http connections.
PS C:> Grant-EC2SecurityGroupIngress -GroupId sg-04037f34-IpProtocol tcp -FromPort 80 -
ToPort 80 -CidrIp 0.0.0.0/0
The above permission, let’s us communicate with the instance using http connection on port 80.
Fig: Instance Information
Figure 5 EC2 Instance Overview

Elastic IP:
Each instance created on Amazon EC2, will have its own Public DNS address. This public DNS
address is associated with the instance as long as it is powered on. When the instance is shut down or terminated, it loses the public dns address. This public DNS address is quite long and subject to change. To make accessing the instance easier, we can associate an instance with an elastic ip address. First we request for an elastic ip and associate it with the instance. After association, the instance can be connected to using the ip address. Secure Connections: Once the instance is set up and connected, we need to establish a secure connectivity to work with the instance. For this we use putty. First we need to create a
public/private key pair using the .pem file that was created earlier.
Figure 6 Public Key Generation

Now that the key pair generation is complete, we connect to the instance using putty or ssh.
ssh -i /path/to/private-key root@
3.2 Server Side Computation:
Once the server is setup and configured, we create and deploy PHP and MYSQ server on the device. Once this is done, I create the script files and save them in the www/html folder. Since I have setup permissions to access this folder from external applications, I save my scripts in this location, and access them.
The major operations carried out by the server are as follows:
1. User Registration and Verification
2. User Login.
3. Encrypting the User Credentials and hash verification to authenticate users
4. Connecting to the remote database and parsing data.
The server side scripts have been written using PHP and MySQL. The client initiates the communications with the server. To optimize the efficiency and to reduce lag times, all the computations are performed at the server.
Information exchange between the client and server is done using JSON parsing and using
TAGS. I have written API calls which recognize the TAGS and perform operations accordingly.
The server identifies two primary TAGS from the client to start the communication, the login tag and the registration tag. The login tag tells the server that the client would like to login using existing credentials, and the registration tag asks the server to open a channel
The server opens a connection with Amazon RDS to interact with the database. If the client wants to register, the client passes the users email address, username and password encoding them using JSON. The server on receiving these parameters processes the inputs and upon validation, communicates with the database to create the accounts. The server also maintains a time stamp of when the accounts were created or updated. One major limitation of using remote storage is that the user information is stored in the clear. This is not secure. To overcome this limitation, two operations are performed by the server before communicating with the database.
Encryption and Salt:
After the server processes the user info, it encrypts the user info by calling the encryption function. The function first generates a salt value for the user details, and computes the hash of the function using the SHA cryptographic function. Whenever the client sends the data to the server, this data is secured before being stored in the database.
Here is a code snippet showing the function to create a new user.

The following code snippet shows the server getting the user info by comparing the stored hashes.

3.3 Database Configuration and Queries:
For this project, I have created an instance of the Amazon Relational Database and have used for remote storage. This database stores the user information in an encrypted format. The server side scripts control and maintain this database.
Figure 7 Relational Database System

Figure 8 Encrypted User Information

3.4 Android Client Development:
The client for this product is an android based device running on android 2.2. When the user opens the application, he/she is presented with the welcome screen. This screen presents the user with two options, Login and Registration. Depending on which option is selected, an intent is called to switch the display to that screen and to load the resources of the specified class files. By using this approach, I ensure that the application does not load all the classes at run time, and only uses them when called, minimizing the memory consumption.
If the registration option is selected, then the application switches the view to the login screen. To create a new account, the user has to enter his username, email address and a password. These values are then encoded using JSON and send to the server. These parameters are stored as a name value pair on the client. The client uses SQLite as the database handler.
The server makes use of MySQL to communicate with the cloud database. The android client uses SQLite as the database handler. Both MySQL and SQLite cannot communicate directly with each other, for this reason, the responses are encoded in JSON and parsed at the client and server to enable the flow of information.
If the user clicks on login, then the user passes his email and password as parameters. The client uses a http post method, to send the information to the server. When receiving information from the server, the client opens a http client object and gets the entity associated with the JSON url. Both login and registration have their own specific url which gives sends the output out in JSON parsed format.
When the user successfully creates an account and logs in, he/she is presented with the control panel. The control panel lists all the functionality the user can access. This includes the image capture application, the image upload and display application and the push notification module.
3.5 Image Capture and Secure:
Image capture and secure is a module, which uses a trigger based mechanism to capture and
store images.
This module makes use of a custom surface view object, to render and display images. When the images are captured, they are saved in the sd card or the internal memory of the device, by using a mediastore object. When the user clicks on the settings button, the user is given an option to upload or retrieve the images. When the upload option is selected, the images are encrypted and removed from the SD card, when the retrieve option is selected, the decryption algorithm, performs the decryption routine, and displays the images back to the user.
For encrypting the images, the Data Encryption Standard is used. The algorithm copies all the
files from the mediastorage object, deletes from the SD card and performs the encryption algorithm. This way, when the user clicks on the encrypted images, he/she will be unable to
view the images as they are encrypted.
The UI elements used in this module are as follows.
SurfaceView: This is the area where the selected image will be displayed.
DisplayArea: This part of the screen lists the 5 recent images along with their description.
Settings: This button is present on the bottom of the screen. The settings screen has two buttons
Backup and Retrieve. Backup has two options dealing with the encryption and backup of images.
Retrieve also has two options dealing with decryption and retrieval of images.
Event Trigger: This button is present on the bottom of the screen. When this button is pressed,
the application uses the panel camera to take a picture.
Figure 10 Image Capture Activity Diagram
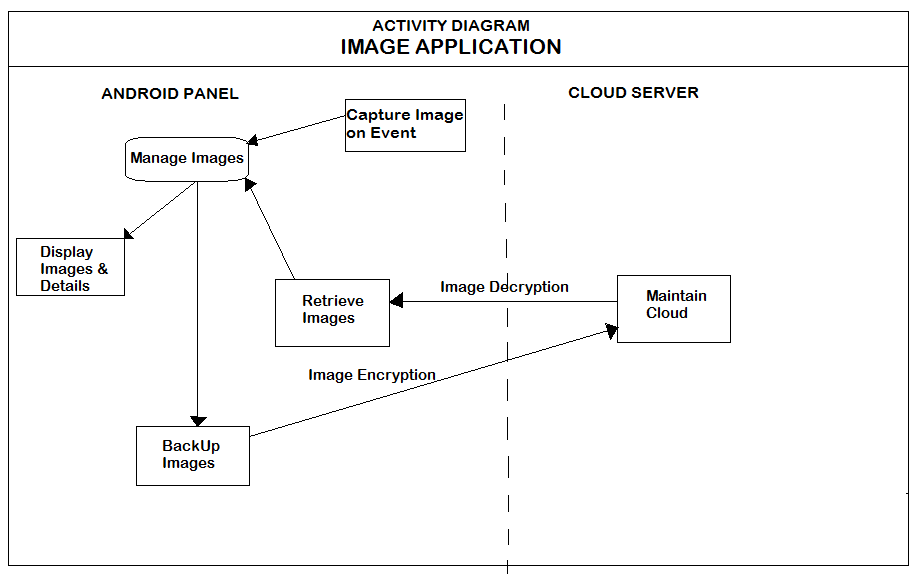
Figure 11 Image Capture Class Diagram
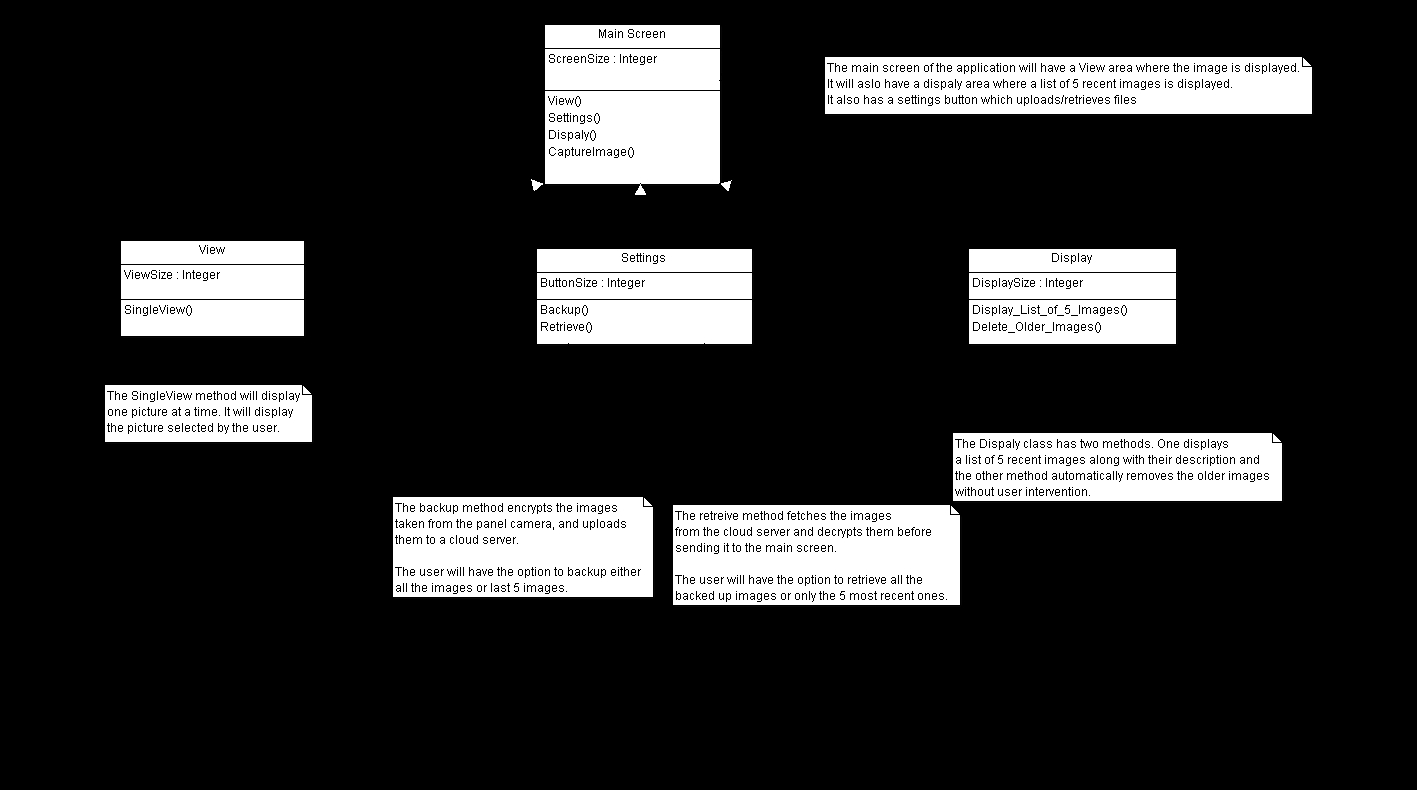
As seen from the above UML diagrams, when the user clicks on the trigger button, the application invokes a surfaceview object, and takes a picture. Once the image is taken, the listview on the right side of the screen is populated with the image and the time stamp. If the user clicks on the image, a bitmap of the image object is created, and is drawn on the image view. The following snippets, give an idea of how this is carried out.


Another functionality offered by this module, is the image encryption and decryption. If the user presses the settings button, or swipes the screen, he/she is given an option to encrypt and hide or decrypt and display the images. When the user swipes the screen, the gesture detection method is called. This method listens to any movement the user makes on the screen and if the specific pattern is detected (in this case swiping the screen) it presents encryption and decryption options to the user. The code snippet for the functions is as follows


3.6 Image Upload and Display:
Image upload and display is a module which uses Amazon Simple Storage Service to upload pictures online and also allow the users, to display it on their mobile devices. This module builds on the image capture module. After taking the pictures , the user can either send them to the server and get a public url which can be used to display the image, or upload the encrypted image which is then stored on the bucket.
First the application creates a client object and passes the credentials file and properties as parameters. When this object connects to Amazon S3, the client authenticates itself, by passing the above information. I have written an image picker activity to select the images. The image picture activity upon selection of the image, calls the onActivityResult method. This method returns an uri object, and calls the upload method.
By using an ImagePicker activity, I optimize the code because the callback action is automatically called, and I do not have to manually copy the output of the bitmap object and process it. Since this is a native android object, the memory utilization is also minimal.
The upload method uses an algorithm, which uses an asynchronous upload mechanism, to upload the files to the server. This method takes the uri object as the input and uploads it to the server, generating a url object. Each url object, can be accessed using a pre-signed link. Pre-signing the url allows the users to access the object without specifying the credentials. The user can then click this link to display the picture online using a browser window. This link can also be shared with other users. This generated link has an expiration time. Once the timer expires, the link will no longer work.
The following code snippet shows the upload method, which is an asynchronous task, getting the image as the bitmap uri and a cursor object to select the image and point the file path.

3.7 Push Notifications:
This module’s primary use will be to poll users about any information related to the security system and allows the developer to send messages to the users.
When the user successfully logs in, the user information is parsed and sent to the server. The server then displays the control panel to the user. The user clicks on Administrative controls, and this opens the screen for the notification system.

As seen in the above picture, first the administrator adds users by entering their email address and clicking on subscribe button. This sends a verification email to the users which they click on to accept the subscription. Once the user subscribes to a topic, the administrator can send them notifications by posting a message and clicking on send. Clicking on View Subscribers, displays the list of subscribed users.
I have implemented this module, by using the API’s provided by Amazon Simple
Notification System. First I create an instance of the Amazon SNS client, and the SQS server by passing the ACCESS_ID and the secret key as the parameters. To post a message, the topicARN and the message contents are sent as parameters to the publish method. Each message sent by the developer, is added to the queue. This queue makes use of an array list, to process the messages and to send them to the amazon server for posting. queueARM methods are used to set up queue policies and to retrieve. To send messages successfully, a queue policy needs to be defined. I have used a hashmap to store the subscriber names and the topicARN.
Figure 13 Notification Example
 3.8 Diagnostic Monitoring:
This module’s primary purpose is to monitor and log all the information about the system’s state.
This module monitors all the information related to wifi connectivity including the signal strength, RSSID, SSID, speed and ip address. It also displays a list of all the active processes along with their cpu usage and memory usage. It also displays the available system memory. Finally it logs all this information and stores it in the cloud server.
 4. Evaluations and Testing:
Since this is a complex application with of modules running and operating across multiple domains, stability and robustness was a primary concern. Since the communication is between the client and server, the communication between the client and server and the message passing between them is of major importance.
The JSON responses generated in response to events, have message codes corresponding to if the operation being performed was a success or failure. These responses help in diagnosing any issues a user might run into.
Response Code Error: This code is returned if the user tries to create an account with already
existing credentials. As seen in the below message, register has a response of 2 meaning that the
registration failed, followed by the message details.
Figure 14 Testing : Error Response Code - Register
 Response Code Error: This code is returned if the user tries to login with incorrect user name
and email details. As seen in the below message, login has a response of 2 meaning that the login
failed, followed by the message details.
Figure 15 Testing Error Response Code - Login
 Response Code – Success: This code is returned if the user login was successful. Along with the
success tag, the message also returns the time stamp at which the account was logged in.
Figure 16 Testing Success Response Code - Login

Response Code – Success: This code is returned if the user registration was successful. Along
with the success tag, the message also returns the time stamp at which the account was created.
Figure 17 Testing Success Response Code - Register
 To verify the client side functionality and general application behavior in android, I have written
several JUnit test cases to validate the behavior.
The following test case is used for verifying if any of the created views are empty or not. If they
are empty, then the test fails implying that the methods are incorrect.
The pseudo code for the test cases is as follows:
Testconditions () {
assertNull(view description);
assertNotNull(button info);
assertNotNull(test condition);
}
The following test case is used to verify if the orientation of the application
TestOrientation {
Activity _get_orientationinfo()
Assertequals(activity.getconfig().getorient())
}
The following is a code sample of the junit test case testing the placement of the settings button.
 5. Conclusion:
Cloud computing has been making significant inroads in the domain of application development. The fact that companies can rely on huge amounts of storage and computational ability without worrying about scalability and availability of resources has brought a lot of visibility to the cloud platform.
This project has allowed me developed a framework working with the android platform and the cloud platform to leverage the benefits of both to provide a seamless integrated solution, addressing the limitations of both the platforms. For my project, I have combined the portability and optimization of mobile devices with the computational resources and storage capabilities of cloud servers bringing together a solution which can easily be expanded to provide multiple functionalities depending on the domain.
Working on this project, has allowed me to work with and learn multiple development environments like Android, which is one of the fastest growing operating systems, PHP for the server side development and Amazon Web Services specifically Amazon S3, RDS, EC2 and SNS to provide seamless integration between the client and server along with JUnit framework for testing.
Working on this project, was very challenging as I had to handle multiple design issues. One of the first design issues that I encountered was that the server side database was MySQL and the android client was only able to handle SQLite queries. To facilitate communication and message passing between the two, I have come up with JSON encoding and TAG responses. These messages are interpreted at both the client and server side, and the responses are transferred between the two.
Another significant challenge was to seamlessly integrate the multiple Amazon Web Services with the android client. Because the project involved communications between different services, and the client was an android application, memory usage and application stability was a primary concern. Because images and the mobile camera are used significantly, I have optimized my code efficiently to handle memory issues by detecting when the application loses focus and closing the background instances, loading classes on demand rather than at application launch, restricting access to the device by using permissions and not keeping sessions active for long.
Because of a multitude of services working in parallel, testing the project to diagnose and fix issues required me to build a comprehensive test methodology. For the server side testing, I have written JSON encoded responses to get the state and diagnose any server side issues, and for the android client, I have written multiple JUnit tests along with logs to test the client side of the application.
Because the project involved cloud computing, privacy of the end user and security of the user data was important, hence I worked on restricting access to the cloud servers, hardening the servers and client side security. To do this, I have encrypted the user data and to avoid sending the data in the clear, I have used a secure hash algorithm to generate hash computations of the user credentials; I then send the hash values to the server, where it is compared with the hash value of the saved credential. If there is a match, then the user is allowed access. This way I ensure the integrity of the credentials without compromising the security.
The future work for this project will be to integrate the application with the Qolsys Home Security System, and work on developing additional features to further improve the product.
I have implemented this module, by using the API’s provided by Amazon Simple
Notification System. First I create an instance of the Amazon SNS client, and the SQS server by passing the ACCESS_ID and the secret key as the parameters. To post a message, the topicARN and the message contents are sent as parameters to the publish method. Each message sent by the developer, is added to the queue. This queue makes use of an array list, to process the messages and to send them to the amazon server for posting. queueARM methods are used to set up queue policies and to retrieve. To send messages successfully, a queue policy needs to be defined. I have used a hashmap to store the subscriber names and the topicARN.
Figure 13 Notification Example
This module’s primary purpose is to monitor and log all the information about the system’s state.
This module monitors all the information related to wifi connectivity including the signal strength, RSSID, SSID, speed and ip address. It also displays a list of all the active processes along with their cpu usage and memory usage. It also displays the available system memory. Finally it logs all this information and stores it in the cloud server.
Since this is a complex application with of modules running and operating across multiple domains, stability and robustness was a primary concern. Since the communication is between the client and server, the communication between the client and server and the message passing between them is of major importance.
The JSON responses generated in response to events, have message codes corresponding to if the operation being performed was a success or failure. These responses help in diagnosing any issues a user might run into.
Response Code Error: This code is returned if the user tries to create an account with already
existing credentials. As seen in the below message, register has a response of 2 meaning that the
registration failed, followed by the message details.
Figure 14 Testing : Error Response Code - Register
and email details. As seen in the below message, login has a response of 2 meaning that the login
failed, followed by the message details.
Figure 15 Testing Error Response Code - Login
success tag, the message also returns the time stamp at which the account was logged in.
Figure 16 Testing Success Response Code - Login
Response Code – Success: This code is returned if the user registration was successful. Along
with the success tag, the message also returns the time stamp at which the account was created.
Figure 17 Testing Success Response Code - Register
several JUnit test cases to validate the behavior.
The following test case is used for verifying if any of the created views are empty or not. If they
are empty, then the test fails implying that the methods are incorrect.
The pseudo code for the test cases is as follows:
Testconditions () {
assertNull(view description);
assertNotNull(button info);
assertNotNull(test condition);
}
The following test case is used to verify if the orientation of the application
TestOrientation {
Activity _get_orientationinfo()
Assertequals(activity.getconfig().getorient())
}
The following is a code sample of the junit test case testing the placement of the settings button.
Cloud computing has been making significant inroads in the domain of application development. The fact that companies can rely on huge amounts of storage and computational ability without worrying about scalability and availability of resources has brought a lot of visibility to the cloud platform.
This project has allowed me developed a framework working with the android platform and the cloud platform to leverage the benefits of both to provide a seamless integrated solution, addressing the limitations of both the platforms. For my project, I have combined the portability and optimization of mobile devices with the computational resources and storage capabilities of cloud servers bringing together a solution which can easily be expanded to provide multiple functionalities depending on the domain.
Working on this project, has allowed me to work with and learn multiple development environments like Android, which is one of the fastest growing operating systems, PHP for the server side development and Amazon Web Services specifically Amazon S3, RDS, EC2 and SNS to provide seamless integration between the client and server along with JUnit framework for testing.
Working on this project, was very challenging as I had to handle multiple design issues. One of the first design issues that I encountered was that the server side database was MySQL and the android client was only able to handle SQLite queries. To facilitate communication and message passing between the two, I have come up with JSON encoding and TAG responses. These messages are interpreted at both the client and server side, and the responses are transferred between the two.
Another significant challenge was to seamlessly integrate the multiple Amazon Web Services with the android client. Because the project involved communications between different services, and the client was an android application, memory usage and application stability was a primary concern. Because images and the mobile camera are used significantly, I have optimized my code efficiently to handle memory issues by detecting when the application loses focus and closing the background instances, loading classes on demand rather than at application launch, restricting access to the device by using permissions and not keeping sessions active for long.
Because of a multitude of services working in parallel, testing the project to diagnose and fix issues required me to build a comprehensive test methodology. For the server side testing, I have written JSON encoded responses to get the state and diagnose any server side issues, and for the android client, I have written multiple JUnit tests along with logs to test the client side of the application.
Because the project involved cloud computing, privacy of the end user and security of the user data was important, hence I worked on restricting access to the cloud servers, hardening the servers and client side security. To do this, I have encrypted the user data and to avoid sending the data in the clear, I have used a secure hash algorithm to generate hash computations of the user credentials; I then send the hash values to the server, where it is compared with the hash value of the saved credential. If there is a match, then the user is allowed access. This way I ensure the integrity of the credentials without compromising the security.
The future work for this project will be to integrate the application with the Qolsys Home Security System, and work on developing additional features to further improve the product.
0 comments:
Post a Comment